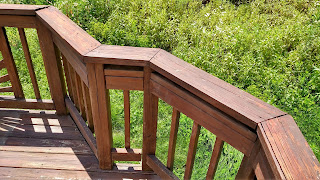
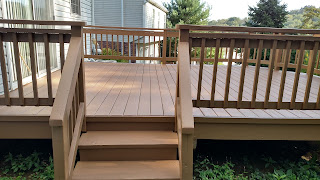
Here we have a sweet place out in Venetia PA. It had been rented and the tenants weren't exactly easy on the place. Needing the deck redone, the interior painted and floor replaced, we began our work to rehabilitate the property. We'll start with the exterior. Here we have the front porch, painted with PPG Manor Hall Exterior paint. Now we'll move on to the deck. It needed power washed, sanded and painted.
As you can see, the decking was pretty worn.
Railings were also in bad shape.
We used Sherwin Williams Superdeck with elastomeric coating on the deck. It resurfaces and waterproofs in one product and is designed to expand and contract with the decking.
SOOOOO here it is before washing and sanding.....
and after many hours of hard work.
Before work....
and after.
The product went on very nicely and flowed into the crevices easily.
In part two we'll move to the interior
Enjoy
Wednesday, September 30, 2015
Saturday, September 5, 2015
Retouching For Your Woodwork
Being a painter we see lots of things that are done wrong.
In this example will be looking at a really horrible paint job done in
the past.
Some of the paint is oil based and all of the paint is dripped
onto beautiful woodwork. So how do you get it off or fix it. If you
have the time stripping it off is the best way to go about it. However if you don't have a lot of time or money we have a quick solution for you, retouching.
You can pick up sample colors of paint at any home
improvement store. What you want is a mid tone brown and a dark brown similar to the woodwork you have.
You can also use liquid acrylics in small amounts. Also pick up a few
foam brushes or small touch up brushes.
Here we can see lots of big white drips. We start with the foam brush in the mid-tone and cover all the white.
The mid-tone will help hide all the light areas, then use your
darker brown to put the wood grain pattern back in to the area you are
retouching.
It doesn't have to be perfect, the eye will naturally blend it together as you look over a room.
Depending on the type of wood you have you may want to pick up a brown with more red in it or more towards the neutral.
Even old roller marks can quickly fade away.
In this area they went pretty crazy with the white paint On such great old woodwork it makes me want to cry.
But after some quick retouching in a very short time we have it looking good.
We'll leave you with one last window pane. Let us know if you have any questions regarding this or any painting project!
Enjoy
Monday, August 31, 2015
Exterior House Painting in Upper St. Clair
This beautiful home in Upper St Clair needed the touch of Hendersonworks for some exterior painting.
Here it is at the beginning. The homeowner had all new shutters and a great deal of the moulding replaced along the top of the house. Another painting company started the job, but due to poor performance, were replaced by someone more dependable. Us.
With heights up to 40 feet, we needed a lift for this one.
Joe and Rian are going at some of the higher points.
Sherwin Williams Duration paint was used on this particular exterior.
The front door was pretty worn.
We livened it up with a vibrant color to accentuate the wonderful tones in the brick.
I really loved the wolf's head door knocker.
The rear of the house has a beautiful patio area again lots of trim.
The French doors under the back porch were also done. Nice flat screen!
And there you have the finished product.
Another satisfied customer!
Enjoy
Wednesday, July 8, 2015
Windows, Doors and Dogs
 Yes it is the busy season. Sorry for not having the time to post things but here's a few of the jobs we've been doing.
These are a few of the many doors we are painting over in Upper St. Clair. High gloss ivory on all the trim! Also painted a really groovy color combination in this bedroom and bathroom area.
Next was a large picture window that had wear and tear plus condensation damage.
We taped off the area sealed it with plastic to keep their house free of dust.
And then sanded it all down.
A fresh coat of stain and new spar urethane brought it back to a like new condition.
Lastly was a kitchen remodel we helped do the painting on. Yes its pink.
Had some trouble as you can see here. Somebody was in our paint tray!
We found the culprit. Many more things going on and many more jobs to post. Now I just need to find the time.
Enjoy
Labels:
Interior Design,
Painting,
Remodeling,
Restoration,
Windows,
Woodwork
Friday, May 1, 2015
Large Spaces and Little Spaces
Whether you need a large space painted like this one...
or a little space like this one.
We can take care of you!
Every job has it's challenges, the larger ones pose problems with ladders or scaffolding being used to solve them.
To little problems which might need a four inch roller and a detail brush.
These two jobs demonstrate show that no matter what your challenge is we can handle it.
Both of these jobs kept a nice warm neutral palette.
Now maybe we should think about colors. Stay tuned for our next post!
Enjoy!
Sunday, April 12, 2015
Kitchen Renovate and Revamp
Here we have another wonderful kitchen revamp project we did for Barb out in Bethel Park. Not only was the job satisfying, the time there was a great deal of fun!
We started with a kitchen in need of updating and a budget that prevented new cabinets.
So we planned on unifying the color palette, resurfacing the existing cabinets and texturizing the walls. An addition of some wainscoting was added too.
There were 3 different colors on the walls including the green here in the front window. The tile was also a mismatch with other parts of the kitchen, it was installed improperly and it was going to be another item to get removed. Framing around the doorways and front window area would all be removed too. The overall theme was to simplify.
Gotta love those handles on the fake woodgrain!
We started with removing the tile on the left side of the kitchen which didn't go to bad.
On the other side we found wallboard installed with the tile wasn't supported on the edges, and when we tried to remove the tile the wallboard just broke apart.
The corners under the cabinet were also left with no support. There was pieces of foamcore used to shim the board against the cabinets. Not really a good thing.
We removed the wall behind the sink area and added 2x4 supports to support new drywall. Once in place we textured the walls with a soft stucco finish.
Here is the new wall with our texture.
Next we scrubbed and degreased the cabinets and primed them for painting.
The doors were all removed and painted out of the kitchen. Base cabinets and drawers remained in the kitchen.
Next the walls were painted with a lovely soft yellow.
Traditional pieced Wanescoting was added in the alcove and on the right side of the kitchen. The cabinets and wainscoting were painted with a warm white.
Then a grand piece built by the homeowners great grandfather was replaced in its spot to be properly accented.
 Here is the wainscoating on the right side of the finished cabinets. New hardware and hinges were also installed.
And is the final product.
Warmed and simplified!
No more tile, broken spaces and multiple colors.
A great shot of the texture and wanescoting and satisfaction of a job well done.
Enjoy!
We started with a kitchen in need of updating and a budget that prevented new cabinets.
So we planned on unifying the color palette, resurfacing the existing cabinets and texturizing the walls. An addition of some wainscoting was added too.
There were 3 different colors on the walls including the green here in the front window. The tile was also a mismatch with other parts of the kitchen, it was installed improperly and it was going to be another item to get removed. Framing around the doorways and front window area would all be removed too. The overall theme was to simplify.
Gotta love those handles on the fake woodgrain!
We started with removing the tile on the left side of the kitchen which didn't go to bad.
On the other side we found wallboard installed with the tile wasn't supported on the edges, and when we tried to remove the tile the wallboard just broke apart.
The corners under the cabinet were also left with no support. There was pieces of foamcore used to shim the board against the cabinets. Not really a good thing.
We removed the wall behind the sink area and added 2x4 supports to support new drywall. Once in place we textured the walls with a soft stucco finish.
Here is the new wall with our texture.
Next we scrubbed and degreased the cabinets and primed them for painting.
The doors were all removed and painted out of the kitchen. Base cabinets and drawers remained in the kitchen.
Next the walls were painted with a lovely soft yellow.
Traditional pieced Wanescoting was added in the alcove and on the right side of the kitchen. The cabinets and wainscoting were painted with a warm white.
Then a grand piece built by the homeowners great grandfather was replaced in its spot to be properly accented.
 Here is the wainscoating on the right side of the finished cabinets. New hardware and hinges were also installed.
And is the final product.
Warmed and simplified!
No more tile, broken spaces and multiple colors.
A great shot of the texture and wanescoting and satisfaction of a job well done.
Enjoy!
Labels:
Interior Design,
Kitchen,
Painting,
Plaster Repair,
Remodeling
Subscribe to:
Comments (Atom)


